STAY & PLAY® Compact Wireless Fence

After you have chosen the location for your transmitter, next:
- Plug your transmitter into a standard wall outlet.
- Turn the transmitter on.
- Adjust the boundary control knob to 8 and the boundary switch to high.
- Make sure the receiver collar battery is properly installed, the static stimulation level is set at 2 or greater, and the test light tool contacts are touching the contact points of the collar.
- Hold the receiver collar down low and in front of you and walk out into your garden.
- When you hear the collar beep and the test light tool illuminates, this represents the boundary of the containment area.
- At this point, you may wish to install the boundary flags included with your system to help you get a visual of the boundary area. You will need the flags to begin training your dog as well.
If you wish to adjust the boundary area, you can either adjust the size of the area by adjusting the boundary dial up or down, or you can adjust the location of the boundary area by moving the transmitter within your home.
Consider the layout of your garden, its size and the area that you want to create for your pet to enjoy. The wireless fence creates a circular containment area, with the transmitter in the centre of the circle. Make sure the entire pet area lies within your property boundaries. If the boundary zone will be less than 14 metres from the transmitter, place the boundary switch on ‘low’. If the boundary zone will be greater than 14 metres place the boundary switch on ‘high’. Remember that you may also move the transmitter within your home to adjust the location of the containment area as needed. You can use one of two methods to set up and check your boundary area. Two-Person Method One person should hold the receiver collar at your pet’s neck height with logo side facing away from the transmitter. This person with the collar should walk out into the garden to the edge of the desired containment area. Facing away from the transmitter, hold the receiver collar at the edge of the desired pet area. The second person, should be at the transmitter. Begin with the boundary control dial set to 8, the person at the transmitter should turn the dial down SLOWLY. When the receiver collar starts to beeps, tell the person at the transmitter to stop turning the boundary control dial. Using cell phones to communicate with each other may help to make this process easier. Now your boundary is set. Note the boundary setting on the transmitter for future reference One-Person Method Measure the shortest distance from the desired boundary zone to the transmitter. Find the distance on the transmitter range chart below and set the boundary switch and boundary control dial. Take the receiver collar to the boundary zone with the receiver collar at your pet’s neck height with logo side facing away from the transmitter. Determine where the receiver collar begins to beep. If the receiver collar beeps before or after the desired boundary zone, return to the transmitter and adjust the boundary control dial. Repeat this process until the receiver collar is beeping at the desired location. Record your settings in your operating guide or next to the transmitter for future reference. Close
Yes. There is no limit to the number of pets you can contain with the containment system. It’s as simple as purchasing an additional (compatible) receiver collar for each pet. You can purchase additional receiver collars online or contact our Customer Care Centre. Before making any changes to your system, remove the receiver collar from your existing pet(s). When adding pets to new or existing electronic fence systems, check the boundary limits for each receiver collar separately before using on your pet and adjust the transmitter range as necessary. Close
Yes, the receiver can be place on any non-metallic strap. However, you must be able and willing to “punch” two holes in your pet's current collar so that the contact points can be properly inserted. Do not attach a lead to a collar that has a receiver on it. This can cause additional pressure on your pet’s neck through the contact points in the collar. Close
This can happen if the static stimulation level is too high. It is best to start on the lowest level of stimulation and increase the levels gradually. To solve your immediate issue, lower the static stimulation level and reassure your pet and offer praise. Make sure you are in control of the situation when your pet receives his/her first static stimulations (have him/her on a lead attached to a separate, non-metallic collar) and lead him into the pet area and praise him/her. If your pet remains fearful, suspend training and start again the next day. Make sure to end all training sessions on a positive note with lots of praise and play. Close
Plug the transmitter into another wall outlet. If the lights don’t come on, contact our Customer Care Centre. Close
- Make sure the receiver is not on level 1.
- Use the test light tool to double check.
- Make sure the transmitter isn’t on beep only (note that not all models have this feature).
- Contact our Customer Care Centre for additional troubleshooting.
- Remove battery from receiver collar(s). If using a receiver collar with multiple levels of stimulation, press and hold the stimulation level button until the LED diminishes. This discharges any battery energy that may have remained in the receiver collar. Also, lift the metal tab that has a bump on the end that is located in the centre of the battery compartment.
- Put boundary switch on transmitter in the ‘high’ position.
- Turn the boundary control dial on the transmitter to position 4.
- Standing within 1.5 - 3 metres of the transmitter, re-insert the batteries into the receiver collar(s).
- Test the boundary by walking out into the safe zone until your receiver responds.
If your receiver collar(s) does not respond, repeat steps 1 - 5. To get the normal boundary settings, dial the boundary control dial toward 8 until the desired boundary settings are established.
- Trees and shrubs will not affect the system.
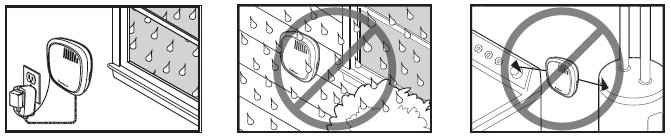
- Do not place the transmitter in or near fixed large metal objects such as metal sheds and cars. Large metal objects can affect the signal by reducing the maximum range of the system at the location of the object. As a result, your pet may receive a static stimulation. If you have a great deal of metal in your garden that you feel my impact your system, you may want to consider an in-ground wired containment system for you and your pet instead.
- The system will work on a mildly sloped garden. The transmitter signal extends 27-32 M depending on the model (old or new)in all directions. A sloping garden or one with hills can cause the pet area to appear less or more than expected. Consider repositioning the transmitter to maximise your pet area.
- Wireless routers can cause inconsistency in signal or reduced range. To test if a wireless router is causing problems, turn the router off, and see if the problem persists. It may be helpful to move the transmitter closer to the router to avoid problems. Try putting the transmitter close (about 30-50cm) to router. There will be a place where both signals will not interfere with each other.
- In-ground system: creates a perimeter of any shape and can have exclusion areas within it. The wire is usually buried just under the ground and can even run through streams. You can also purchase additional wire that will create a perimeter of up to 1000 ares (25 acres) (selected systems only).
- Wireless system: creates a circular perimeter around a central transmitter with a diameter of up to 64 meters (selected systems only) It is a portable system, but the dog should always be fully trained and familiar with the area in which the system is used.
In addition, there are systems that use receiver collars which are specifically designed for small dogs, cats and stubborn dogs. Purchase an extra compatible receiver collar for each additional pet who will use the system. Note that certain systems are not compatible and in-ground and wireless collars are not compatible.
The static stimulation is safe and harmless. It is effective enough to get your pet’s attention. Close
No. Containment systems are only effective on pets who wear the receiver collar. Other animals can still enter your garden. Close
Many of our collars and systems are compatible. Check your system for a list of compatible collars below. Note that wireless collars and transmitters aren't compatible with in-ground systems and collars. You can't add a wireless collar to an existing in-ground system, for example.
Wireless
In-Ground
Training
- Turn your pet’s receiver collar on and set it to level 1, the tone only setting. If your collar does not have a tone only setting, do not place the collar on your pet during this phase of training.
- Place the receiver collar on your pet’s neck or simply hold the collar near enough for your pet to hear the beeping of the collar during training.
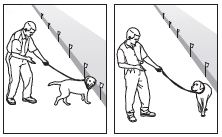
- Put a separate non-metallic collar on your pet’s neck ABOVE the receiver collar and attach a lead. Be sure the extra collar does not put pressure on the contact points.
Familiarising your pet with the boundary flags
- Begin by having some play time with you pet, making it fun for your pet.
- Walking your pet on a lead in the pet area.
- Move towards the boundary flags. Allow your pet to hear the warning tone, then lead your pet back into the containment area quickly. Praise your pet when he leaves the boundary zone.
- Repeat this process at several different boundary flags.
- Continue the training until your pet resists going near the boundary flag. It may help to say "no" if your pet attempts to go near the flags.
- Work with your pet in 15 minute increments. Have about 3 training sessions per day.
Introducing your pet to the static stimulation
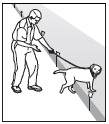
- With the collar on your pet and in the "on" position, walk your pet on a lead in the pet area.
- Calmly praise and talk to your pet.
- Allow your pet to move toward the boundary flags.
- When your pet enters the warning zone, the receiver collar will activate and start beeping. As your pet continues past the flags into the static stimulation zone, he will receive a static stimulation.
- Immediately after your pet receives a stimulation, lead him back into the pet area. Praise him warmly and keep very calm body language.
- Repeat this process at several different boundary flags. Never pull or call your pet into the static stimulation zone.
Training sessions should start at 10-15 minutes, gradually increasing to over an hour. Your pet is ready for this step only when he clearly avoids the entire boundary flag line, regardless of any distractions or temptations. During this step, do not leave your pet unattended.
Goal
To train your pet to stay within the pet area even with distractions outside of the pet area.
Setup
- Put a separate non-metallic collar on your pet’s neck ABOVE the receiver collar and attach a lead. Be sure the extra collar does not put pressure on the contact points.
- Create distractions to tempt your pet to enter the warning and static stimulation zones, such as having a family member cross from inside the pet area to outside of it, throwing a ball outside of the pet area or having a neighbour walk their pet outside the pet area.
Steps
- Put the collar on your pet in the "on" position.
- Walk your pet on a lead toward the boundary flags. Use one of the distraction methods listed above. If your pet follows, let him feel a stimulation and quickly lead him back into the pet area and praise him. If your pet does not follow the family member, praise him warmly.
- Have a family member or a neighbour with a dog walk outside the pet area parallel to the boundary flag line.
- Repeat the interaction with your pet as in steps 1 and 2.
- With your pet on a lead, throw a ball outside the boundary flag line. Again, repeat the interaction with your dog as in previous steps.
- Repeat distractions at several different boundary flags.
- Walk around the garden and play with your pet, staying within the pet area at all times.
- Preoccupy yourself with another task in the garden while watching your pet.
- Should your pet escape, take the receiver collar off or turn the system off at the fence transmitter and lead him or her back into the pet area.
- Your pet is now ready to use the containment system. Check in on your pet at regular intervals.
- Note: After you are satisfied your pet's training is complete, remove every other boundary flag every 4 days until all flags are removed. Save boundary flags for future use.
- Remove the receiver collar from your pet and ensure it is on.
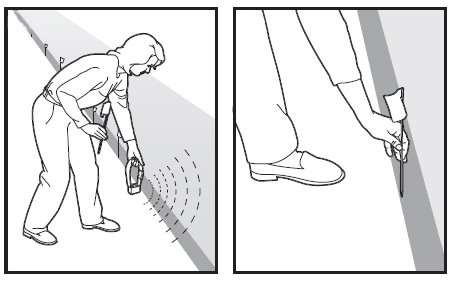
- Hold the test light to the receiver collar contact points and walk into your garden.
- Hold the collar and test light at the level of your pet's height.
- Walk towards the warning zone until the receiver collar beeps and the test light tool illuminates. The higher the level of stimulation of the receiver collar, the brighter the light with flash. If you cannot see the light flash, increase the level of stimulation of the collar for the purpose of determining boundary flag location only.
- Place a boundary flag in the ground at the location where you hear the beep and see the light of the test light tool flash.
- Walk back into the pet area until the beeping stops.
- Repeat this process around your garden, placing flags every 3 metres until the containment area is fully marked with flags.
- Proper fit of the collar is important. A collar worn for too long or made too tight on the pet’s neck may cause skin damage. Ranging from redness to pressure ulcers; this condition is commonly known as bed sores.
- When possible reposition the collar on the pet’s neck every few hours.
- Check the fit to prevent excessive pressure.
- Always follow the instructions in your product operating guide.
- Never connect a lead to the electronic collar; it will cause excessive pressure on the contact points within the collar.
- Wash the dog’s neck area and the contacts of the collar weekly with a damp cloth.
- You may need to trim your pet's hair in the area of the contact points for your system to function properly. However, never shave the dog’s neck; this may lead to a rash or infection.
- Some pets have sensitivity to the contact points in the collar, a condition similar to bed sores in humans. You may find after some time that your pet is very tolerant of the collar. If so, you may relax some of these precautions.
If a rash or sore is found on your pet:
- Discontinue use of the collar until the skin has healed.
- If the condition persists beyond 48 hours, see your veterinarian.
Pets should be at least 6 months old before you start training them to use a containment system. Close
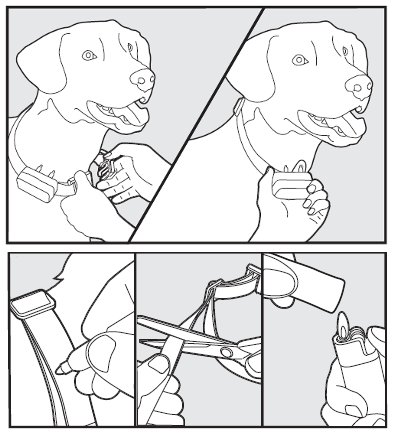
- The proper fit and placement of your receiver collar is important for effective training. The contact points must have direct contact with your pets skin on the underside of their neck. To ensure a proper fit, please follow these steps:
- Make sure that the battery is not installed in the receiver collar.
- Start with your pet standing comfortably.
- Centre the contact points underneath your pet’s neck, touching the skin. If your pet has a long or thick coat, consider using the long contact points to reach through the fur. These can be purchased by contacting our Customer Care Centre. It is sometimes necessary to trim the hair around the contact points to make sure that contact is consistent.
- Check the tightness of the receiver collar by inserting one finger between the end of a contact point and your pet’s neck. The fit should be snug but not constricting.
- Allow your pet to wear the collar for several minutes then recheck the fit. Check the fit again as your pet becomes more comfortable with the receiver collar.
- Next, trim the collar length. Mark the desired length of the receiver collar with a pen. Allow for growth if your pet is young or grows a thick winter coat.
- Remove the receiver collar from your pet and cut off the excess strap.
- If your receiver has a nylon strap, seal the edge of the cut collar by applying a flame along the frayed edge.
Our Commitment to Customer Care
800-457-3911
Monday to Friday
08:00 - 19:00
Need help with your product?
Customer service is at the heart of everything we do. We’re committed to giving you expert advice to ensure you always receive the very best.
Join Our Newsletter
Sign up today for the latest news, promotions and more from PetSafe® Brand.
